Payment terminals
What Payment terminals allow card payments or automated cash payments to be processed directly via the POS. Where Admin: SIDES Pay > Payment terminals. |
Set up a payment terminal
Before a terminal can be used, it must be set up in SIDES Admin and assigned to a POS.
For example: SIDES Pay-Set up a payment terminal
- Go to Admin: SIDES Pay > Payment terminals.
- Select the desired store from the drop-down menu at the top.
- Click "Add terminal".
- Select "SIDES Pay" as the payment service provider.
- Enter the required terminal data:
- Description (1.): Enter an internal name for the card reader.
- Registration code (2.): Enter the device registration code (format: 3 hyphen-separated words).
- Cash register binding (3.): Specify the POS
if desired.
- Under "Payment types", set the switch for "Card terminal" to "Yes".
Please make sure that the corresponding payment method "Card terminal" or "Card terminal (card payment)" has been activated for the store. If the payment method is completely missing, it must first be enabled by us. - Under "Printer to print the receipt", select the desired and
configured printer. At least one printer must have been created and selected.
- Then click "Save".
Printer for payment terminal receipts
A printer must be available that can print payment receipts for terminal payments. To set up a printer, follow these steps:
- Go to Admin: Hardware > Printer.
- Select the relevant store.
- Click "Add printer", add a printer, and enter the required data.
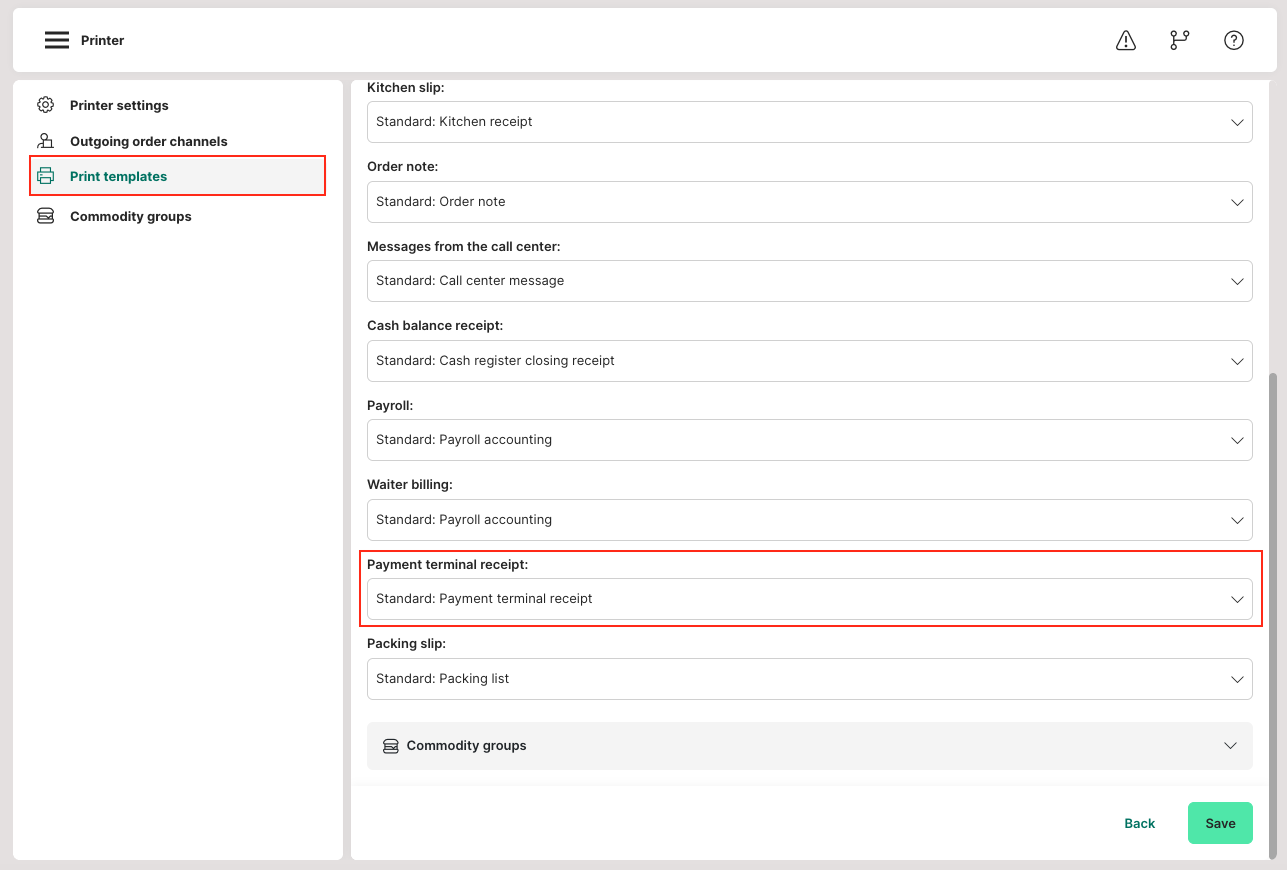
- Under "Print templates", for "What is this printer supposed to print?", select the template "Standard: Payment terminal receipt" under "Payment terminal receipt".
If the printer has already been set up, click "Edit" here and only perform the last step to select the corresponding print template.
Connection issues
If there are problems when trying to complete an order, for example a counter sale, such as being unable to establish a connection to the terminal, there are two simpler/shorter solutions than the options offered on the page linked in the error message (the solutions shown here are for Windows 10 Professional):
1. Change the DNS server
The first option, which provides a permanent solution, is to change the DNS server in the network settings. Make sure to enter the correct numbers in the correct fields (Preferred DNS server / Alternate DNS server and IPv4 / IPv6 [if available]).
The options are:
- 1.1.1.1 (Cloudflare) or
- 8.8.8.8 (Google Public DNS)
To do this, follow these steps:
- Right-click the "Internet connection/network icon" at the bottom right of the taskbar/toolbar.
- Left-click "Open Network & Internet settings".
- Left-click "Wi-Fi".
- Left-click "Network and Sharing Center" under "Related settings" at the bottom (alternatively, use the following path in Explorer: System Settings > Network and Internet > Network and Sharing Center).
- Left-click "Change adapter settings" on the left (alternatively, in Explorer, go from "Network and Internet" to "Network Connections").
- Right-click the active connection or corresponding network being used.
- Left-click "Properties".
- On the "Networking" tab, left-click the list entries "Internet Protocol Version 4 (TCP/IPv4)" and/or "Internet Protocol Version 6 (TCP/IPv6)", then left-click the "Properties" button that becomes available.
- At the bottom, instead of the option "Obtain DNS server address automatically", select the option "Use the following DNS server addresses" below, then enter the relevant DNS address (see "Options" above) in the "Preferred DNS server" field (and, if applicable, 0.0.0.0 in the "Alternate DNS server" field).
- (Finally, it may be necessary to right-click the active connection or corresponding network under "Adapter settings"/"Network Connections", then left-click "Disable", then right-click again the active connection or corresponding network, left-click "Enable", and then, if necessary, manually reconnect to the connection/network via the "Internet connection/network icon" menu at the bottom right).
2. Add the IP or DNS address to the hosts file
The second option is to enter your own IP or DNS address, which can be found in various places (on the PC/in the network settings/in the Wi-Fi router account or potentially in an error message in the browser console), at the very bottom of the "hosts" file at C:\Windows\System32\drivers\etc\hosts
To edit the file and move it out and back, it may be necessary to perform actions as an administrator, create a copy of the file, first move the file to the desktop, and/or rename it or the copy.
Please also note that, depending on the internet provider and settings, the address may never change, may change once a month, or may change with every new connection (PC restart / disconnecting from and then reconnecting to the network).
A static address that does not change can be configured in the router/network settings in the associated account (accessible via a URL on the internet provider's website). If this is not done, the address will probably need to be updated regularly in the file.
Use the terminal at the POS
- When completing the order at the POS, select the payment method "Card terminal".
(The payment method "Card terminal" is only available in the POS for "Counter sales", "Table sales", and "Staff sales", as well as in the "Mobile POS".) - Click "Complete order".
- After clicking "Complete order", the following window appears. Please check the displayed amount again and click "Start transaction".
- The following window then appears. Please follow the instructions on the terminal.
- Once all data has been entered via the terminal, the print job is triggered automatically and the order is completed.
- You can then close the window or print another copy of the receipt.
Reprint receipt
The most recent payment and its associated receipt can be reprinted from the POS using the "Printer" button in the upper-right corner.
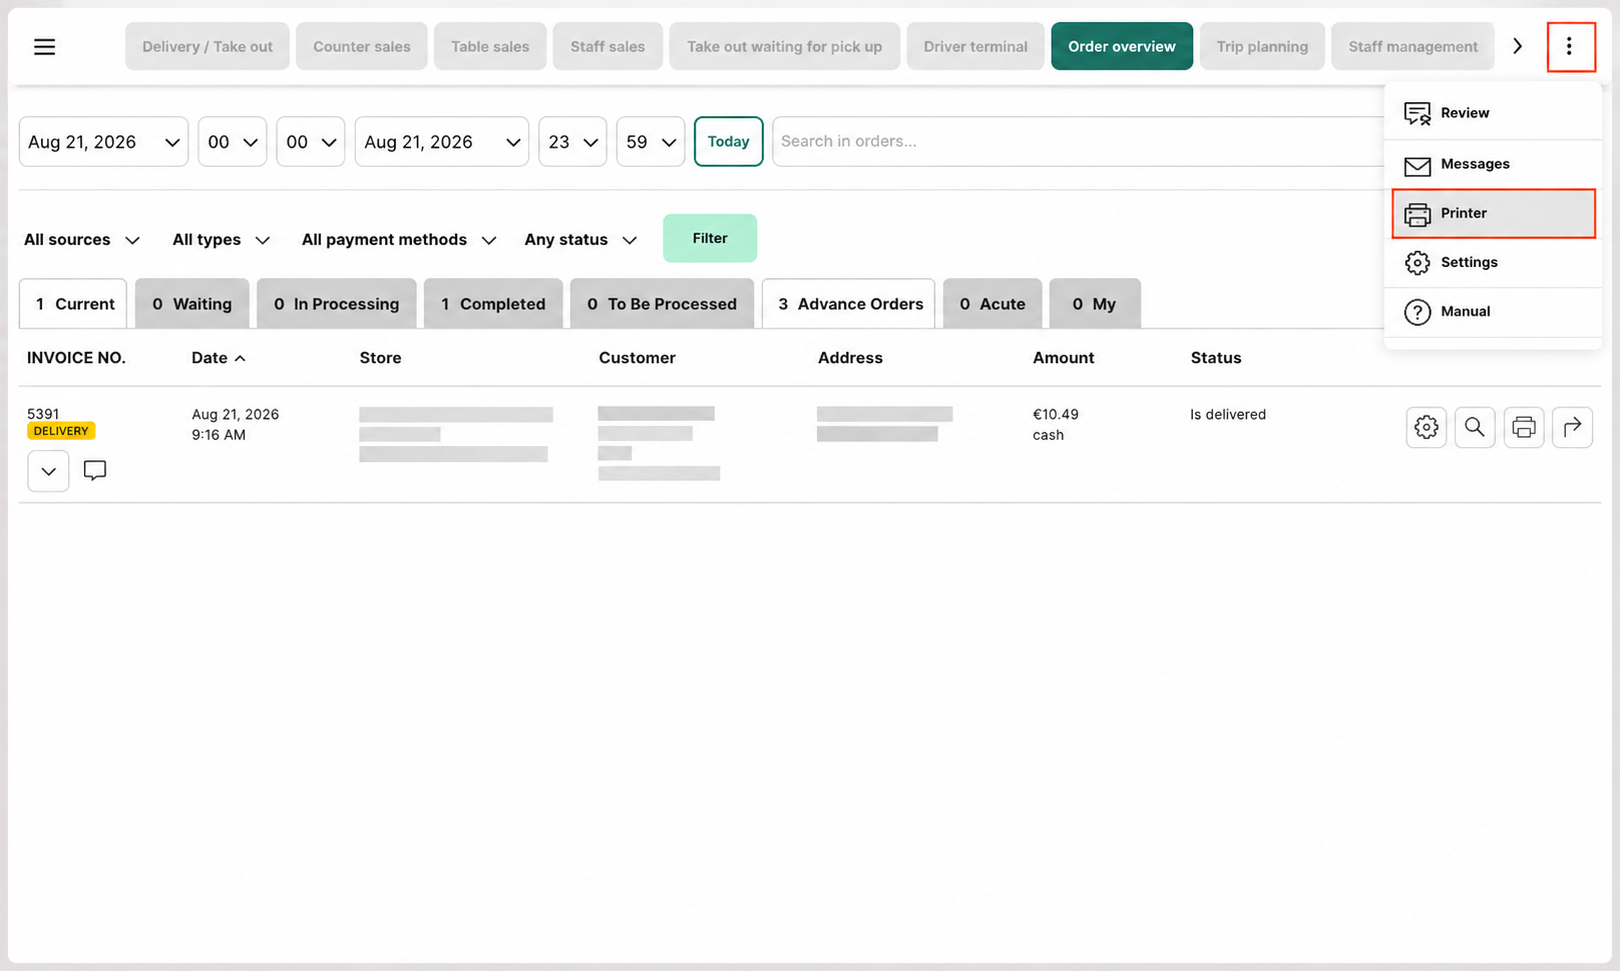
If you do not want to reprint a receipt now, you can do so at any time from the order view.
Cancellations
Orders paid via an Card terminal can be cancelled from the order list.
- Open the "Order overview" in the POS.
- Find the order you want to cancel and, as with other orders, click the trash can icon "Cancel order" to cancel the order.
- You will then see the following message. Enter a reason for the cancellation and then click "Confirm".
- Then select the terminal through which the cancellation/refund should be processed. If the terminal and the amount to be refunded are correct, click "Start transaction".
- Then follow the instructions on the terminal.
- Once all instructions on the terminal have been followed, a corresponding cancellation receipt is printed and the cancellation is processed automatically.
- Once the cancellation receipt has been printed successfully, the transaction is complete and the connection is closed. If the customer also wants a copy of the cancellation receipt, another copy can be printed here.