Loyalty-Campaigns (levels and loyalty card/stamp card)
What Loyalty campaigns allow you to create levels and a loyalty card/stamp card to retain customers long-term through rewards such as discounts or free items. Where Admin: Marketing campaigns > Voucher list > Add voucher. Admin: Loyalty program > Loyalty-Campaigns > Add level. Admin: Loyalty program > Loyalty-Campaigns > Add loyalty card. |
Introduction
Loyalty campaigns offer a loyalty system that rewards customers for repeat orders and continuous interactions.
The system consists of two main components:
- Loyalty levels (e.g. Bronze, Silver, Gold).
- Loyalty card/stamp card (e.g. a free product after 10 orders).
You can offer both options individually or together.
Preparation
Before you start, consider the following for your campaigns:
- What do you want to offer? Loyalty levels, a loyalty card/stamp card, or both?
- Loyalty levels:
- How many levels do you want to offer? (e.g. Bronze, Silver, Gold)
- How should levels be reached? (by points, orders, or revenue/money)
- What rewards should customers receive per level? (e.g. 10% discount, free item, etc.)
- Loyalty card/stamp card:
- After how many orders/stamps should a reward be given?
- What reward should customers receive? (e.g. 10% discount, free item, etc.)
These considerations are the basis for your campaigns.
Display of the loyalty system campaign
View e.g. in Webshop with active levels and loyalty card
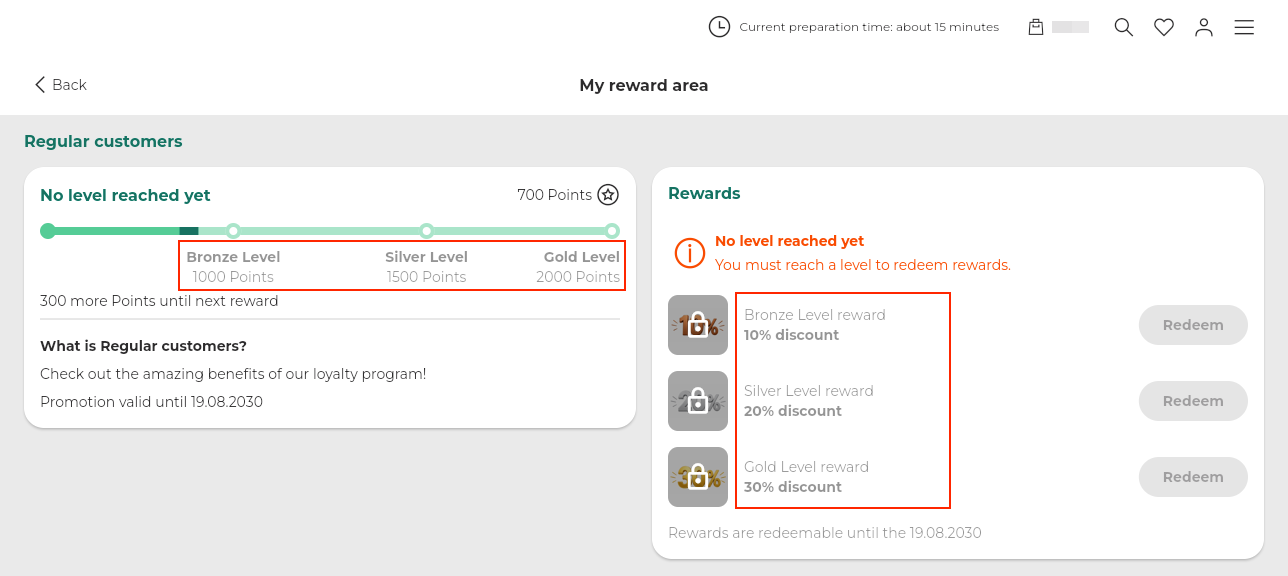
Once the customer is logged in, they can track their progress directly in the webshop. Both the collected points for the loyalty levels and the number of orders for the loyalty card are displayed.
If only one of the two campaigns is active, only that one will be displayed.
Clicking the arrow (>) opens the loyalty system area with an overview of all available rewards.
- Loyalty levels: The current level and its associated rewards are displayed (e.g. Bronze, Silver, Gold)
- Loyalty card/stamp card: Progress towards the next reward is displayed (e.g. free item)
Rewards not yet reached are visible but locked:
Once the required number of points, orders, or revenue has been reached, the reward is automatically unlocked.
Summary
- First, create all required vouchers.
- Create a campaign of type "Levels".
- Define the loyalty levels (e.g. Bronze, Silver, Gold) and link them to the corresponding vouchers.
- Set up a loyalty card/stamp card with the desired conditions.
This way, you build a complete loyalty campaign for customer retention.
1. Create a voucher for the loyalty level
Before creating the actual campaign, you need to create a separate voucher for each loyalty level. These vouchers will later be used as rewards in the campaign.
Procedure for setting up, e.g., a 10% discount on the entire receipt:
- Navigate to Admin: Marketing campaigns > Voucher list.
- Click "Add voucher".
- Enter a "Name" e.g. "10% discount". This name is visible to the customer.
- Under "Type of coupon/voucher", select the desired voucher type, e.g. "Rebate for entire receipt".
- Under "Percent", set the value, e.g. "10%".
- Enable the "Loyalty-Campaigns" option so the voucher is available for the loyalty campaign.
Note: The validity of the voucher is automatically taken from the loyalty level once the voucher has been assigned. - In the "Stores where the voucher is valid" section, define the stores in which the voucher is valid.
- Click "Save".
- Upload an image in the "Webshop homepage" section. This image will be displayed to the user for the respective level in the rewards area.
 Note:
Note: Repeat these steps for each additional level (e.g. Silver: 20%, Gold: 30%). Each voucher must have a unique name.
2. Create a voucher for the loyalty card/stamp card
If you want to use a stamp card, create a corresponding voucher for it (e.g. a free item after 10 orders).
With this voucher, customers receive e.g. a free item once they have reached the defined number of orders (e.g. from the 11th order onwards).
Note: Only one voucher can be stored for a loyalty card.
Note: Only one voucher can be stored for a loyalty card.
Procedure for setting up, e.g., a free drink:
- Navigate to Admin: Marketing campaigns > Voucher list.
- Click "Add voucher".
- Enter a "Name", e.g. "Free drink: Biozisch Orange".
- Under "Type of coupon/voucher", select the desired voucher type, e.g. "Free item".
- Under "Item", select the desired item.
- Enable the "Loyalty-Campaigns" option.
Note: The validity of the voucher is automatically taken from the loyalty card once the voucher has been assigned. - In the "Stores where the voucher is valid" section, define the stores in which the voucher is valid.
- Click "Save".
- Upload an image in the "Webshop homepage" section. This image will be displayed to the user in the loyalty card in the rewards area.
3. Campaign: create loyalty level
Once all vouchers have been created, you can set up the actual loyalty campaign for the level.
Setup procedure:
- Navigate to Admin: Loyalty progam > Loyalty-Campaigns.
- Under "Add level", click "Add".
- Enter a "Campaign name", e.g. "Regular customers". This name is visible to the customer.
- Set the campaign validity period ("valid from"/"valid until").
- Under "Store selection", select the participating stores.
- Define the "Measured value" section.
Note: In edit mode, the fields in the "Measured value" section are grayed out and cannot be edited. To make changes, deactivate the campaign first. The fields can then be edited. - Immediate redemption:
- Enabled: The reward is automatically added to the cart when the level is reached. No manual action is required from the customer and no redemption buttons are available in the overview.
- Disabled: The reward can be redeemed manually by the customer via the redemption button.
- Rolling (measurement period):
Define how many days of customer activity should be taken into account. Only points, orders, or revenue within this period count, older values automatically drop out. If a customer accumulates enough points within the time window, they are upgraded and the rolling window moves forward. If the score falls below the required threshold within the configured time window, they are downgraded accordingly. - Measurement type: Select the desired reward logic:
- Additive: The customer receives the rewards of the current level as well as all levels below it (e.g. Bronze 10% + Silver 20% + Gold 30% = 60% discount).
- Isolated (recommended): The customer receives only the reward of the current level (e.g. Gold = 30% discount). The rewards of previous levels remain locked.
- Under "Notifications", define when the customer should be informed about changes in the loyalty system. Notification settings can be adjusted afterwards.
Notifications can be sent for: - Level upgrade or downgrade
- Expiry of a level status
- Progress towards the next reward
- Inactivity
The corresponding email templates can be adjusted in the global settings. Additional information on "Email templates" is available here: https://support.get-sides.de/portal/en/kb/articles/email-templates.
Note: Keep in mind that customers can unsubscribe from these. - Click "Create".
Note: Only one loyalty level campaign can be created, e.g. "Regular customers". Within this campaign, however, multiple conditions can be defined, e.g. Bronze, Silver, and Gold. These are explained in the next step.
4. Define conditions for the loyalty level
Now you define the individual levels of your campaign. The levels determine from which number of points, orders, or revenue/money a customer advances to a higher reward level.
Example configuration:
- Bronze: 1,000 points
- Silver: 1,500 points
- Gold: 2,000 points
Setup procedure:
- Navigate to Admin: Loyalty program > Loyalty-Campaigns.
- In the campaign overview under "Levels", click "Add level".
- Enter a "Name", e.g. "Bronze Level". This name is visible to the customer.
- Under "Condition type", select the desired level condition:
- Points: The customer collects points to reach a level, e.g. 1,000 points to advance to the Bronze level.
- Orders: The number of orders placed determines advancement to a higher level, e.g. from the 5th order onwards, the next level is reached.
- Money: The customer's total revenue is taken into account to reach a level, e.g. from €200 in revenue, the next level is reached.
Note: All levels must use the same condition type (points, orders, or revenue). The condition type cannot be changed afterwards and applies to all conditions and levels of the campaign. Adjustments are only possible by deleting all existing conditions and creating them again. Important information:
If points (rather than money or orders) are used to achieve loyalty level, the corresponding loyalty program rules must be configured.
Please refer to the following documentation: https://support.get-sides.de/portal/en/kb/articles/loyalty-rules.
Otherwise, no points will be collected, making it impossible to reach any loyalty level. - In the "Condition value" field, enter the required value for the respective level, e.g. "1000" for the Bronze level.
- Under "Voucher", select the previously created voucher, e.g. "10% discount".
- You will then see the voucher type and value, and can review this information once more.
- Click "Create".
Note:
Repeat these steps for each additional level. Make sure that each higher level has a correspondingly higher condition value (e.g. Bronze: 1,000 points, Silver: 1,500 points, Gold: 2,000 points).
Important information:
Within a level, only conditions of the same type are permitted (points, orders, or revenue). Combinations are not possible. The condition value must not match any existing level. Notes will be displayed. Each voucher must also be unique and cannot be used on multiple levels or loyalty card/stamp cards.
The order of the levels is automatically displayed based on the condition value, e.g. Bronze: 1,000 points, Silver: 1,500 points, Gold: 2,000 points:
Disable loyalty points input field
Via the setting "Enable redemption of bonus points" (Admin: Loyalty program > Loyalty settings), the input field for redeeming loyalty points can be disabled. This means points can only be collected and used for loyalty levels. Users continue to earn points as usual for specific items or shopping carts, but there is no input field available to redeem points for payment. The points are used exclusively to calculate loyalty levels.
Via the setting "Enable redemption of bonus points" (Admin: Loyalty program > Loyalty settings), the input field for redeeming loyalty points can be disabled. This means points can only be collected and used for loyalty levels. Users continue to earn points as usual for specific items or shopping carts, but there is no input field available to redeem points for payment. The points are used exclusively to calculate loyalty levels.
5. Campaign: create loyalty card/stamp card
A digital loyalty card/stamp card works just like a classic paper stamp card, only fully digital and automated.
It tracks the number of a customer's orders and automatically unlocks a reward once a predefined number of completed orders has been reached.
Example configuration:
- Required orders: 10
- Reward triggered from: 11th order
- Possible rewards: Discounts, free items, etc., depending on what you defined in the loyalty card voucher.
Note: If the reward is not redeemed immediately, the progress remains at e.g. 10/10. The counter is only reset after redemption. Any further orders in the meantime are recorded and taken into account in the progress after redemption. In the event of a cancellation, the counter is reduced accordingly.
Setup procedure:
- Navigate to Admin: Loyalty program > Loyalty-Campaigns.
- In the campaign area under "Loyalty card", click "Add".
- Enter a "Name", e.g. "Stamp card". This name is visible to the customer.
- Set the "Validity" ("valid from"/"valid until").
- Under "Store selection", select the participating stores.
- Optionally configure under "Notifications" when customers should be informed, e.g. in case of inactivity or progress towards the next reward. These settings can be adjusted afterwards.
The corresponding email templates can be adjusted in the global settings. Additional information on "Email templates" is available here: https://support.get-sides.de/portal/en/kb/articles/email-templates. - Click "Create".
Note:
Only one loyalty card with a single condition can be created.
6. Define conditions for the loyalty card/stamp card
Finally, you define after how many orders the customer receives a reward for the loyalty card and what that reward should be.
Note: Only one condition can be created for the loyalty card.
Setup procedure:
- Navigate to Admin: Loyalty program > Loyalty-Campaigns.
- In the campaign area under "Loyalty card", click "Add condition".
Note: If the "Add condition" field is not visible, click on the stamp card to expand the area. - Under "Required orders", enter the number of orders needed to activate the reward, e.g. "10".
- Select the previously created stamp card voucher e.g. "Free drink: Biozisch Orange".
- You will then see the voucher type and can review the information once more.
- Click "Save".
Example: After 10 orders, the customer receives a free item on their 11th purchase and can redeem it:
Related Articles
New shopping cart in Webshop
What The new shopping cart in Webshop provides a more modern and clearer ordering experience with features such as a permanently visible order button, loyalty programs, product recommendations, and highlighting of the minimum order value. Where ...Redeem loyalty points at the self-ordering terminal (SOT)
What By redeeming loyalty points at the self-ordering terminal (SOT), customers have the opportunity to redeem their accumulated points for discounts. Where Admin: Incentives > Loyalty settings > Customer account required to receive loyalty points. ...Loyalty-Settings
What The basic settings for the loyalty program. Where Admin: Loyalty Program > Loyalty-Settings. The loyalty system allows customers to receive loyalty points, which they can use to reduce the amount they have to pay for future orders. This will ...Loyalty-Statistics
What With the statistics of the loyalty points, the awarded and redeemed points per store can be displayed. Where Admin: Loyalty Program > Loyalty-Statistics. The Loyalty-Statistics can be found under Admin: Loyalty Program > Loyalty-Statistics. This ...Loyalty-Rules
What In the Loyalty-Rules section, rules can be created about when and how many loyalty points the customer will receive. Where Admin: Loyalty Program > Loyalty-Rules. The Loyalty-Rules can be found under Admin: Loyalty Program > Loyalty-Rules. This ...