Show vouchers on the webshop start page
What Displaying
vouchers on the webshop start page increases transparency for current
promotions, improves user guidance, and supports faster purchasing
decisions. Where Admin: Marketing campaigns > Voucher list. |
Displaying vouchers on the webshop start page is intended to prominently highlight current promotions. This increases the visibility of discount campaigns, creates transparency for users, and positively influences purchasing decisions.
Benefits
- High visibility of vouchers directly on the webshop start page.
- Clear purchase incentive for visitors immediately on the start page.
- Improved user guidance and clarity.
Requirements
- A voucher with the start page display option activated in the webshop.
- An uploaded image for displaying on the starpage.
- The activated option "Start page with content in a tile layout" in the webshop settings (under Admin: Webshop & App > Webshop settings > Start page > Start page with content in a tile layout).
Setting up a voucher for the start page
- Go to the "Voucher list" section under Admin: Marketing campaigns > Voucher list to create a voucher.
- Click on "Add voucher".
- Set the desired voucher conditions (e.g., discount, validity, restrictions).
More information on creating vouchers is available here: https://support.get-sides.de/portal/en/kb/articles/voucher. - In the "Webshop start page" section, activate the option "Use on the start page in the webshop".
- Upload a suitable image to be displayed on the start page. Maximum file size: 1,000 KB.
- Optional: If you want to use an image from an external source, you can add it under "Image for the webshop from an external source". Otherwise, leave the field unchanged.
- Save the settings with "Save".
Note: Vouchers are displayed in the webshop in the order they were created.
Display on the webshop start page
After setup, the voucher will be displayed on the webshop start page. Visitors see the voucher immediately and can use it during the ordering process.
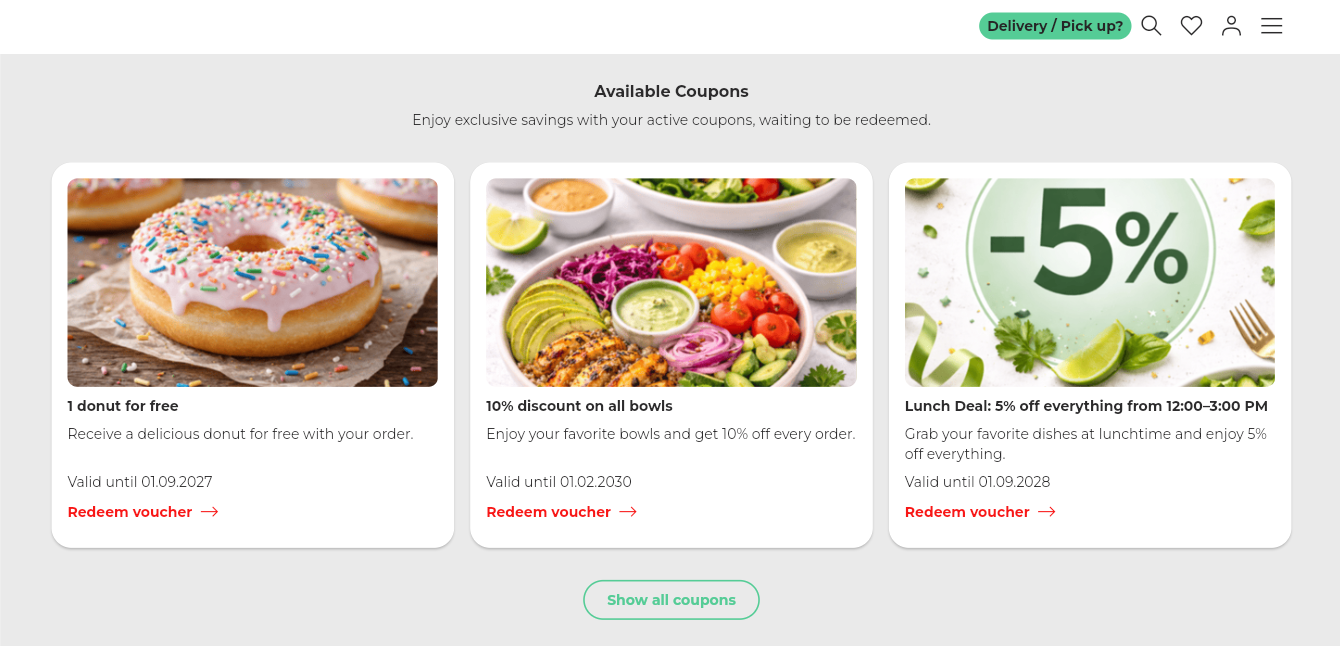
After selecting a voucher, customers can either redeem it directly in the webshop or, if a Self-Ordering Terminal (SOT) is available, display a QR code for redemption at the terminal.
The voucher is activated once one of the following options is chosen:
- Redeem in the webshop: After selecting the store, the voucher is automatically added to the cart.
- Display QR code for the SOT: A QR code is displayed, which can be scanned at the Self-Ordering Terminal.
Optional separate voucher page
If needed, a separate voucher page can be activated where customers can view all vouchers also displayed on the start page, providing direct access after selecting a store.
- To set up a separate voucher page, open the "Webshop settings" under Admin: Webshop & App > Webshop settings.
- Go to "Marketing & Social Media" and activate the option "Activate coupon page".
- Save the settings for the test shop and apply changes to the live shop.
Separate voucher page in the webshop:
Notes
- The voucher must be active and valid.
- The image used should be readable and optimized for the start page.
- Changes to vouchers or webshop settings may take a moment to become visible, depending on the system.
Related Articles
Start page in Webshop
What The webshop start page displays product recommendations, start page vouchers, store information, a promotion for the customer account, favorites, recently placed orders, information about the loyalty program, as well as tiles for social media ...Vouchers
What Vouchers can be used in many ways for offers and discounts, e.g. to retain customers, attract new customers, increase sales and improve customer satisfaction. Where Admin: Marketing campaigns > Voucher list > Add voucher. This guide covers the ...Webshop settings
What Your own webshop can be customized and personalized in a certain way. Where Admin: Webshop & App > Webshop settings. Introduction In the webshop settings, your own webshop can be customized and adjusted to a certain extent. This includes, among ...Show deposit as additional or inclusive in the webshop/app
What The option "Show deposit as plus" determines whether deposit amounts are displayed in the webshop/app in the product selection and in the shopping cart plus or including the product price. Where Admin: Global settings > Global store settings > ...Configure and personalize webshop settings
What This guide helps you efficiently set up your webshop and create a modern, engaging, and user-friendly online presence. Where Admin: Webshop & App > Webshop settings. With this guide, you are guided step by step through the configuration process, ...